| Create Audio CD |
 |
What: This project allows you to create an audio CD using WAV, MP3 or WMA files. Note: this procedure is not for copying already created and mastered original audio CDs. If you have already created a master audio CD in another application or this application and you would like to make additional copies, please use the Copy CD project.
Recommended for: Creating Audio CDs
How to:
Step 1: Select Audio Project from the Starter Window or the New Project Panel. An Audio Project sub menu will be displayed. Choose Create Audio CD. Step one of the Create Audio CD wizard will be displayed.
| Step 2: Click the "Get Files to Burn" button to open a browse window to choose your tracks. |
|
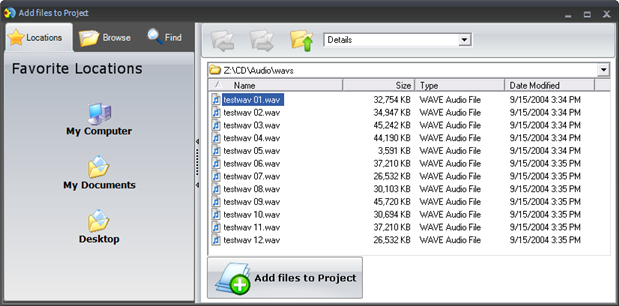
Step 3: Use the Look In drop down, Favorites, Browse or Find Tabs on the bottom of the left pane to find the audio files. (See below for more information on these tab option) Double Click on the file to add it to your project. You may also drag files to the track list window. Finally, you may select multiple tracks using ctrl or shift keys or select multiple items by holding your left mouse button as you drag a square around the tracks you want to add. Once you have selected the items, click the Add files to Project button. When you are finished, click Done to close this window. Skip to Step 4
To find the audio file you may also click on the tabs to browse in explorer mode or search for files. Below is a description of each of the search types.
Locations. Click on the Locations tab to display favorite locations such as Desktop, My Documents or My Computer.
Browse. Click on the Browse tab to display files in tree view on the left side of the screen. Open and close folders by clicking the + or - next to each folder. Click on the folder to view the contents on the right side of the window.
Find. Click on the Find tab to search for audio files. Type in all or part of a file name to search for any audio file that matches. All WAV, MP3 and WMA files matching the typed criteria will be displayed. Use the * modifier to search for specific file. Example: type *.mp3 or *.wav to search for all files ending those specific extensions.
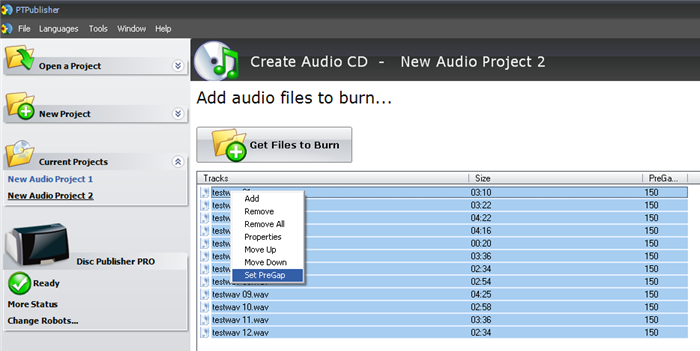
| Step 4: Verify the track order is correct. If you would like to change the order, select the track and use the up and down arrows to move the tracks. Remove the track by selecting the track and clicking the X. Preview the track by double clicking the track or selecting the track and clicking the information button. A audio preview window will be displayed and the track will be played. |
 |
|
|
Note: You can adjust the Pregap value by selecting individual tracks or all tracks and then right clicking on the selection to bring up a context menu. From the menu select Set Pregap to adjust the amount of the gap between tracks. Each time the value is increased by 75 it is equivalent to adding 1 second to the pregap. |
|
| Step 5: Review the information in the track list. You may title the disc by typing in the Volume label box at the bottom right. Click the next arrow to continue. |
|
| Step 6: Select the print label file by clicking the select a label button. Click here for more complete information about the Add a Print file window. When you have selected print label file, click the next arrow. |
|
Step 7 : Verify information on the summary window, choose the number of copies and click Go. Click here for more information about Audio Project Options
|
|
Once the job starts the Publisher Status window will appear. Here you can view the status of the printer, the robot, and the drive. You can also view a log of all activity. For more information visit the Publisher Status help document.
 |
Trouble Shoot Audio Project
 |
 |
Audio CDs created with the burner in the unit have static, crackling or popping in the background. |
There are several reasons for this.
Burn Speed. We recommend burning at no more than 16x. This is due to the format of Audio CDs. Audio CDs do not have built in error correction measures like data and DVD formats.
Media Quality. Better quality media can burn audio at higher speeds with out problems. Some customers have been able to successfully burn Audio at 52x. We recommend the media available at www.primerastore.com for a good quality audio burning surface.
Update software and drive firmware. Make sure you have the latest software, each newer version has an updated burning engine that makes it compatible with more media types.
|
Track information is not displaying on a PC or Mac in software programs such as Windows Media Player or ITunes. |
Adding CD Text to your audio CD WILL NOT accomplish this. Most of these programs do not display CD Text. These programs display track information by accessing one of a number of international databases via the internet. They assign information to discs and tracks based on their data characteristics or ISRC codes. You must submit information to these databases to get your CD recognized on a PC or MAC. Some databases are free, others are not. If a disc is assigned track titles based on this database, this information is only stored on that computer and not on the disc.
Note: Using PTPublisher SE you can not add CD Text or ISRC codes.
Create MP3 CD
What: This project allows you create an MP3 CD. MP3 CDs can be played in may newer CD and DVD players that support MP3 CDs. Note: this procedure is not for copying already created and mastered original audio CDs. If you have already created a master audio CD in another application or this application and you would like to make additional copies, please use the Copy CD project.
Recommended for: Creating MP3 CDs. MP3 CDS can fit 10 times more music on the same disc in a compressed audio format.
How to:
Step 1: Select Audio Project from the Starter Window or the New Project Panel. An Audio Project sub menu will be displayed. Choose Create MP3 CD. Step one of the Create MP3 CD wizard will be displayed.
| Step 2: Click the "Get Files to Burn" button to open a browse window to choose your tracks. |
|
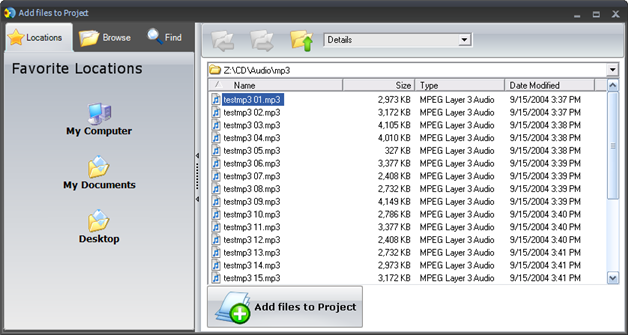
Step 3: Use the Look In drop down, Favorites, Browse or Find Tabs on the bottom of the left pane to find the MP3 file. (See below for more information on these tab option) Double Click on the file to add it to your project. You may also drag files to the track list window. Finally, you may select multiple tracks using ctrl or shift keys or select multiple items by holding your left mouse button as you drag a square around the tracks you want to add. Once you have selected the items, click the Add files to Project button. When you are finished, click Done to close this window. Skip to Step 4
To find the MP3 file you may also click on the tabs to browse in explorer mode or search for files. Below is a description of each of the search types.
Locations. Click on the Locations tab to display favorite locations such as Desktop, My Documents or My Computer.
Browse. Click on the Browse tab to display files in tree view on the left side of the screen. Open and close folders by clicking the + or - next to each folder. Click on the folder to view the contents on the right side of the window.
Find. Click on the Find tab to search for audio files. Type in all or part of a file name to search for any audio file that matches. All MP3 files matching the typed criteria will be displayed.
| Step 4: Remove the track by selecting the track and clicking the X. Preview the track by double clicking the track or selecting the track and clicking the information button. A audio preview window will be displayed and the track will be played. Unfortunately track order can not be set. By default track order is automatically alphabetical based on the file name. |
 |
| Step 5: Review the information in the track list. You may title the disc by typing in the Volume label box at the bottom right. Click the next arrow to continue. |
|
| Step 6: Select the print label file by clicking the select a label button. Click here for more complete information about the Add a Print file window. When you have selected print label file, click the next arrow. |
|
Step 7 : Verify information on the summary window, choose the number of copies and click Go. Click here for more information about Audio Project Options
|
|
Once the job starts the Publisher Status window will appear. Here you can view the status of the printer, the robot, and the drive. You can also view a log of all activity. For more information visit the Publisher Status help document.
|
Trouble Shoot MP3 Project
|
|
Tracks are not playing in the order that I intended. |
It is not possible to set the order of the tracks on an MP3 CD using PTPublisher. MP3 CDs are essentially data CDs that have MP3 files on them. Windows or an MP3 compatable player will play them in the default order of the folder. This is usually alpha-numeric. If software on a computer is playing the MP3 CD it may be able to determine a track number from imbedded MP3 tags. |
