What: A data disc job allows you to create a data disc on a CD or DVD using files on your hard drive. You can replicate the file structure on your hard drive or you can create your own customized file structure.
Recommended for: Use the data disc job to create software installation discs, or data discs containing image files, presentation files, documents or any other Windows file type. This job type is also useful for creating backup CDs or DVDs of important files on your hard drive.
How to:
Step 1: Select Data Project from the Starter Window or the New Project Panel. An Data Project sub menu will be displayed. Choose Create Data CD or Create Data DVD. Step one of the Create Data CD wizard will be displayed.
| Step 2: Click the "Get Files to Burn" button to open a browse window to choose your tracks. |
|
Step 3: Use the Look In drop down, Favorites, Browse or Find Tabs on the bottom of the left pane to find the data file. (See below for more information on these tab option) Double Click on the file to add it to your project. You may also drag files to the file list window. Finally, you may select multiple files or folders using ctrl or shift keys or select multiple items by holding your left mouse button as you drag a square around the files/folders you want to add. Once you have selected the items, click the Add files to Project button. When you are finished, click Done to close this window. Skip to Step 4
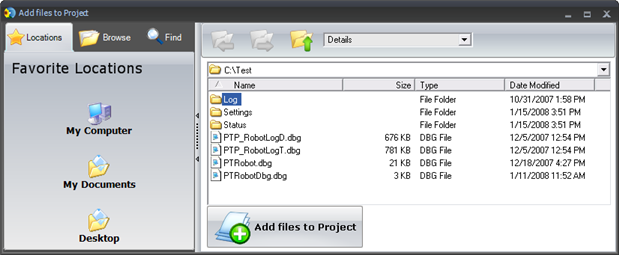
To find the data file you may also click on the tabs to browse in explorer mode or search for files. Below is a description of each of the search types. Hover your mouse over each tab on the screen capture above to view the contents of that tab.
Locations. Click on the Locations tab to display favorite locations such as Desktop, My Documents or My Computer.
Browse. Click on the Browse tab to display files in tree view on the left side of the screen. Open and close folders by clicking the + or - next to each folder. Click on the folder to view the contents on the right side of the window.
Find. Click on the Find tab to search for audio files. Select the type of file you would like to add. Type in all or part of a file name to search for any audio file that matches. Use the * modifier to search for specific file. Example: type *.doc or *.pdf to search for all files ending those specific extensions.
| Step 4: Remove a file or folder by selecting it and clicking the X. Display the properties of a file by double clicking it or selecting the file and clicking the information button. An information window will be displayed. |
|
| Step 5: Review the information in the file list window. You may title the disc if by typing in the Volume label box at the bottom right.Click on the disc type icon to toggle between different disc types: CD, DVD, DVD-DL. Click the next arrow to continue. |
|
| Step 6: Select the print label file by clicking the select a label button. Click here for more complete information about the Add a Print file window. When you have selected print label file, click the next arrow. |
|
Step 7 : Verify information on the summary window, choose the number of copies and click Go. Click here for more information about Audio Project Options
|
|
Once the job starts the Publisher Status window will appear. Here you can view the status of the printer, the robot, and the drive. You can also view a log of all activity. For more information visit the Publisher Status help document.
 |
Trouble Shoot Data Project
 |
 |
The Publisher is producing recording errors, rejected discs, or bad discs. What can I do? |
The top reasons for recording errors, rejected discs or bad discs are listed below:
1. Defective - Low Quality Media. Try New Media. There are many low quality brands available at reduced cost. With the reduced cost comes reduced quality. If you are interested in low reject rates and high customer playability and compatibility use high quality media.
2. Check for Clear Disc. See this article.
3. Burn Speed. Try using a lower burn speed. This is especially helpful for audio discs. We don't recommend burning audio at higher than Medium.
4. Hardware Issues. (This step is especially necessary if the duplicator is rejecting every blank CD or DVD)
A. Replace USB cable.
B. Do not use USB extension cables.
C. Try a new USB port on your computer.
D. Do not plug the unit into a hub, a port on the monitor or keyboard or a port on another external device such as a printer or hard drive.
5. System Resources. Very Important! This probably causes 50% of burning issues. Make sure your PC is up to specifications printed in the manual and posted on our web site. Also, make sure you are not running other programs or using other peripherals while the unit is running. It is very sensitive to system resources and uses them heavily especially when burning and printing at the same time.
6. Update software. Make sure your PTPublisher software has been updated. Software updates can provide better burning support for new media types. This can reduce burning problems. For the latest updates click the Check for Updates button in the Support Center.
7. Drive Firmware. Check Firmware Update Page to see if your drive has a firmware upgrade. Find the drive model and firmware version by clicking the Drive Properties button on the Publisher Status Screen. Firmware updates can provide better burning support for new media types. This can reduce burning problems.
8. Project type issues. Try another job type. Often, the burning error is introduced during the master disc read in process. If you try a Data Project instead and it does not fail, this is usually a good indication that the problem is a result of a bad master disc.
9. Verify. If you are choosing to verify your recordings, try disabling verify. The unit will still reject bad discs. Verify is an extremely high quality standard. It compares the copy with the master bit for bit. If it finds a discrepancy it rejects the disc. The disc is most likely still playable and the errors are not visually or audibly detectable.
|
