PTPublisher Summary Window

| The Summary Window is divided into the Job Summary section and the Job Options section. Verify the information on the summary screen and set the number of copies. If everything looks correct you are not required to enter the job options window. The default settings are optimized to give you the best quality burn. Simply click Go to start the job. |
|
Job Summary
This areas displays information about the data you have chosen, a thumbnail and file name of the print file you have chosen and picture and description of the Disc Publisher Robot you have chosen. If any of this information is incorrect, use the back arrow at the bottom of the screen to go back to appropriate window to correct it.
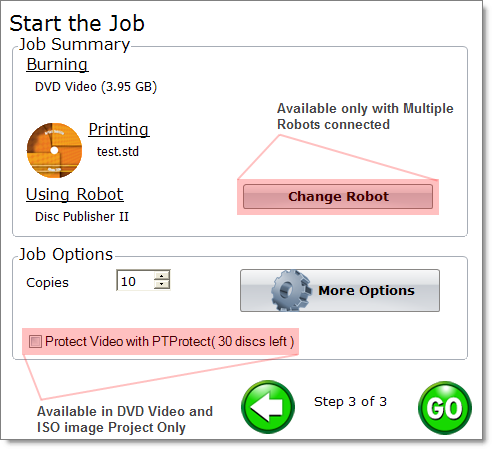
Change Robot - This is only available with multiple robots connected. Click it to change the robot to which this project will be sent. See the Multiple Robots section for more information.
Protect Video with PTProtect - This is only available in the DVD Video and ISO image Project with purchase of PTProtect USB dongle. See the PTProtect section for more information.
Job Options (More Options Button)
Here you can choose the number of copies for this job. For any job type you can click on the Job Options button for additional options for that job. Below is a description of all Job Options. Not all options are available for all Job Types. If the options is not available it will be hidden. If you would like these settings to be the default for all jobs of this type click "Save as Defaults". When you have determined the correct settings click "Set".
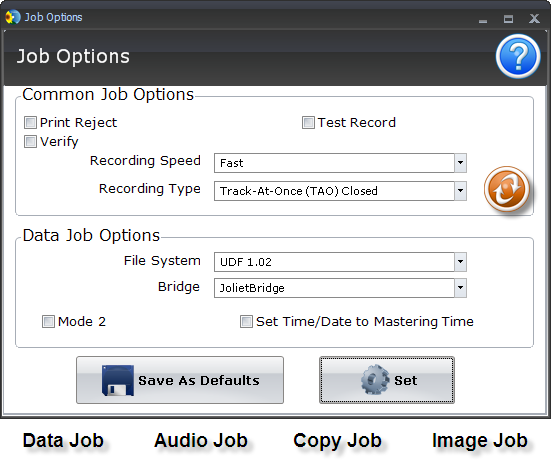
Print Reject. If this option is checked, rejected discs will have the word "Reject" printed on them. This is especially useful if you are not printing on the disc and you would like to differentiate between good and bad discs.
Recording Type
Disc-at-Once. If this options is checked, the lead-in, all the tracks and lead-out are written in same action. The laser is kept on for the entire session.
Track-at-Once. This is the default. For track at once, the laser is turned off after each track, which produces a two-second gap. The
track-at-once feature, enables songs and data to be written at different intervals. The
lead-in sectors that are written at the beginning of each session contain the
location where additional data can be placed on the disc.
Closed/Open - If this option is selected the burned disc will be closed. Once a disc is closed no additional data can be added. If this option is left unchecked the disc will be left open so that additional data can be added in additional sessions.
Test Record. If this option is checked the recorder tests a disc for recordability before burning. The drive laser is set to
read power and the entire surface is scanned for errors. This takes the same
amount of time as recording. (DVD+R media can not be tested)
Verify. If this option is checked, it compares the copy with the
master bit for bit. If it finds a discrepancy it rejects the disc. Verify is an extremely high quality standard. If the disc
is audio or video, the discs may still be playable and the errors may not be
detectable by the human eyes or ears. This operation may be useful to verify
software installation discs where it is extremely important to have accurate
copies of all installation files. Checking this option will double the time it takes to record each disc.
Recording Speed. Set the recording speed with this option. The fastest recording speed is determined by the lowest maximum speed of the blank media or the drive. For example: Fastest speed in a 16x max drive with 16x max media would burn at 16x if the drive manufactures testing with that media determined the media could be burned at 16x without errors. In many cases a slower speed should be selected to achieve the least number of rejected discs.
File System. The file system is the method the files and folder are arranged on the burned disc. Joliet is best for most CD burning applications. UDF 1.02 is best for DVD burning. If you would like to make your burned disc compatible with as many computers as possible use the ISO9660 system. Most of the differences between file system types relates to file name length and
character restrictions and folder level depth. ISO is the most restrictive and UDF is the least restrictive.
Bridge. Set the bridge to an alternate file system than what is set in the File System setting. This will allow the disc to be read as either system depending on the operating system reading the disc. For example: Set the File System to ISO 9660 and the Bridge to Joliet if you want to make the disc compatible with both.
Set Time and Date to Mastering Time. If this option is checked, the volume label will automatically be set to the current time and date. |
