PTProtect

PTProtect allows you copy-protect any DVD Video and mass produce protected discs using the PTPublisher software and a Primera Disc Publisher.
The DVD Video must first be converted into a ISO image or be in authored into VIDEO_TS and AUDIO_TS data folders on a hard drive. If you already have a DVD master disc use the Protect DVD Using an ISO Image method described below. If you have a DVD project that you would like to copy-protect, choose the option in your DVD authoring software which allows you to create DVD folders on your hard drive, then follow the Protect DVD Using DVD Video Project instructions below.
To protect DVDs you must first insert the PTProtect USB Dongle  (100, 1000 or 5000 protections) into a USB port on the same computer that the Disc Publisher is connected to. Once you insert the dongle it will appear in My Computer as the next available drive letter with a Volume Label as "PTProtect". (100, 1000 or 5000 protections) into a USB port on the same computer that the Disc Publisher is connected to. Once you insert the dongle it will appear in My Computer as the next available drive letter with a Volume Label as "PTProtect".
When PTPublisher is launched the PTProtect option will be enabled. The number of protections enabled will be visible on the Summary screen (Step 3) of the DVD Video Project or Image Project.
Note: You will receive 3 free protections before the dongle is connected. After the free protections are used the PTProtect option is still visible but not selectable.
Protect DVD Using an ISO Image.
To create an ISO image from an existing DVD master follow this procedure(Skip if you already have an ISO):
Step 1: Select Other Project from the Starter Window or the New Project Panel. An Other Project sub menu will be displayed. Choose Create a Disc Image. Step one of the Create a Disc Image wizard will be displayed.
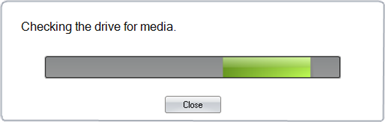
Step 2:After checking the drive for media, you will be prompted to place the DVD master you would like to image into the drive inside the Disc Publisher. The tray door will open automatically. Place the disc in the drive and click Close.
If you want to use a different drive as the Source Drive, click the drop-down arrow and choose the appropriate drive. PTPublisher will check for media in this drive. If no media is present it will open the drive.
Step 3: The disc information will be read by PTPublisher and displayed on the Drive Properties section in the center of the window.
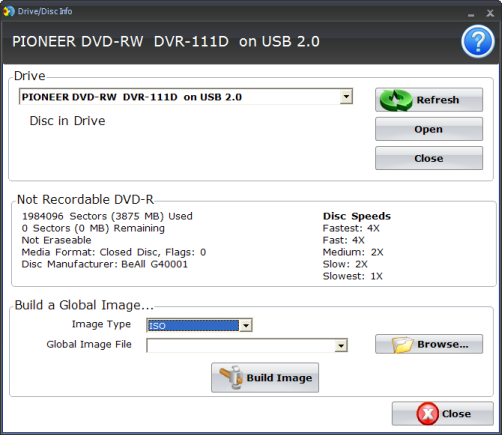
Step 4: Choose ISO for the image type.
Step 5: Click Browse... to choose a location for your image.
Step 6: Click Build Image to create the image. When the image is complete move on to the next section.
Once the job starts the Publisher Status window will appear. Here you can view the status of the printer, the robot, and the drive. You can also view a log of all activity. For more information visit the Publisher Status help document.
To protect and existing ISO image follow this procedure.
Step 1: Select Other Project from the Starter Window or the New Project Panel. An Other Project sub menu will be displayed. Choose Burn Disc from Image. Step one of the Burn Disc from Image wizard will be displayed.
| Step 2: Click the "Browse" button to open a browse window to choose your iso image file. |
|
Step 3: Double-click on the file to add it to your project. Once you have selected the items, click the Add files to Project button. When you are finished, click Done to close this window.
| Step 4: Select the print label file by clicking the select a label button. Click here for more complete information about the Add a Print file window. When you have selected print label file, click the green next arrow. |
 |
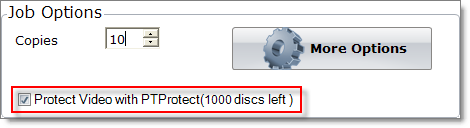
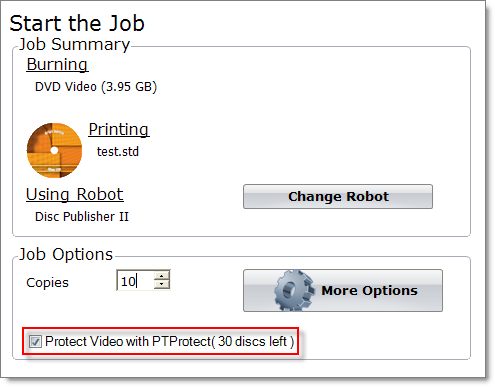
Step 5: Verify information on the summary window. Choose the number of copies. Check the PTProtect box. Click Go. A "Protecting Image" status bar will appear for up to one minute depending on the size of your DVD after which your DVD project will proceed normally. See the Job Summary Overview for more information.
|
|
Protect DVD Using DVD Video Project
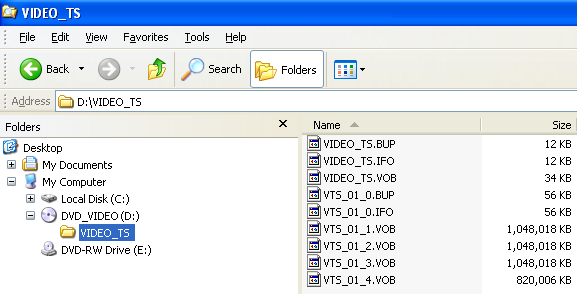
Step 1: Using Windows Explorer, copy the AUDIO_TS (optional) and VIDEO_TS folders from the master DVD to your hard drive. Or, use your DVD publishing software to create an output format in AUDIO_TS and VIDEO_TS folders. A VIDEO_TS folder must be at the root of any DVD. Inside the VIDEO_TS folder are specific DVD files shown below that are created by your authoring software.
Step 2: Select DVD Project - DVD Video Disc. A DVD Video Project setup window will be displayed.
Step 3: Select the VIDIO_TS folder by clicking the Browse button. Any corresponding AUDIO_TS folder will automatically be added.
Step 4: Add a print file. Adding a print file is the same for any job type. See the Add a Print File Overview for more information.
Step 5: Review the Job Summary window to make sure all of your settings are correct. Choose the number of copies. Check the PTProtect box. Click the green Go button. A "Protecting Image" status bar will appear for up to one minute depending on the size of your DVD after which your DVD project will proceed normally. See the Job Summary Overview for more information.
|